Introduction
I started reading the Miniflux project’s code on September 27th. Reading a mature open-source project is like reading a book that suits you – the pace is slow but rewarding. As I’m nearing the end of reading this project’s code, I’m putting together this blog post as a record and to share the experience.
Before we begin, a brief introduction to Miniflux. Miniflux is an open-source RSS reader service, similar to Tiny Tiny RSS. If you’ve used RSS reader services before, this should feel familiar – deploying Miniflux is essentially having your own Feedly service. The project is a SaaS application built with Go and Vanilla JS (native JavaScript APIs without any frameworks), advocating for minimal external dependencies, simplicity, maintainability, and extensibility. As a result, the project contains many foundational implementations (details you’d typically only encounter when developing a web framework itself – when building projects based on frameworks like Django/Rails, these features come built-in and ready to use).
This article uses small code snippets to document interesting points discovered during the reading process. If any of these points interest you, you can then dive into the code yourself. I’d prefer this blog post to feel like introducing a book – letting you know what’s interesting about it, so you can decide for yourself whether it suits you, or which parts are relevant to you. You don’t have to read a book cover to cover; finding the parts that interest you and reading only those is a perfectly valid approach.
Software engineering should be an interesting endeavor – or rather, as practitioners, we should strive to discover those interesting points, piercing through the cognitive fog created by high-level abstractions.
Contents
Database Abstraction Without an ORM
If you want to use Go’s standard library database/sql to encapsulate SQL operations in your project, this is a good reference.
In Miniflux, database table management code is divided into two categories. The first is the encapsulation of SQL operations for each table, located in the storage package, where different tables correspond to different files within the storage directory. For example, the users table corresponds to user.go. Here’s one operation from user.go:
// SetLastLogin updates the last login date of a user.
func (s *Storage) SetLastLogin(userID int64) error {
	query := `UPDATE users SET last_login_at=now() WHERE id=$1`
	_, err := s.db.Exec(query, userID)
	if err != nil {
		return fmt.Errorf(`store: unable to update last login date: %v`, err)
	}

	return nil
}
The second category is the abstraction of table structures and related request objects, located in the model package, where different tables correspond to different files within the model package. For example, the users table corresponds to user.go. Here are two abstractions from user.go:
// User represents a user in the system.
type User struct {
	ID                     int64      `json:"id"`
	Username               string     `json:"username"`
	Password               string     `json:"-"`
	IsAdmin                bool       `json:"is_admin"`
	Theme                  string     `json:"theme"`
	Language               string     `json:"language"`
	Timezone               string     `json:"timezone"`
	EntryDirection         string     `json:"entry_sorting_direction"`
	EntryOrder             string     `json:"entry_sorting_order"`
	Stylesheet             string     `json:"stylesheet"`
	GoogleID               string     `json:"google_id"`
	OpenIDConnectID        string     `json:"openid_connect_id"`
	EntriesPerPage         int        `json:"entries_per_page"`
	KeyboardShortcuts      bool       `json:"keyboard_shortcuts"`

    // Part of the code has been omitted...

}

// UserCreationRequest represents the request to create a user.
type UserCreationRequest struct {
	Username        string `json:"username"`
	Password        string `json:"password"`
	IsAdmin         bool   `json:"is_admin"`
	GoogleID        string `json:"google_id"`
	OpenIDConnectID string `json:"openid_connect_id"`
}
The first struct corresponds to a complete record in the users table. When creating a user, upon success, an instance of this struct is returned.
The second struct corresponds to the actual data provided by the user during a creation request. When creating a user, only essential information is required (e.g., username/password); non-essential information uses database field defaults (users can supplement their information by editing their profile). The storage package’s user.go contains methods that consume this essential information, for example:
func (s *Storage) CreateUser(userCreationRequest *model.UserCreationRequest) (*model.User, error) {

    // Part of the code has been omitted...

    query := `
		INSERT INTO users
			(username, password, is_admin, google_id, openid_connect_id)
		VALUES
			(LOWER($1), $2, $3, $4, $5)
		RETURNING
			id,
			username,
			is_admin,
			language,
			theme,
			timezone,
			entry_direction,
			entries_per_page,
			keyboard_shortcuts,

            // Part of the code has been omitted...

	`

	tx, err := s.db.Begin()
	if err != nil {
		return nil, fmt.Errorf(`store: unable to start transaction: %v`, err)
	}

	var user model.User
	err = tx.QueryRow(
		query,
		userCreationRequest.Username,
		hashedPassword,
		userCreationRequest.IsAdmin,
		userCreationRequest.GoogleID,
		userCreationRequest.OpenIDConnectID,
	).Scan(
		&user.ID,
		&user.Username,
		&user.IsAdmin,
		&user.Language,
		&user.Theme,
		&user.Timezone,
		&user.EntryDirection,
		&user.EntriesPerPage,
		&user.KeyboardShortcuts,

        // Part of the code has been omitted...

	)
	if err != nil {
		tx.Rollback()
		return nil, fmt.Errorf(`store: unable to create user: %v`, err)
	}

    // Part of the code has been omitted...

	if err := tx.Commit(); err != nil {
		return nil, fmt.Errorf(`store: unable to commit transaction: %v`, err)
	}

	return &user, nil
}
In the method above, you can see the user creation request struct being passed as a function parameter. After successful creation, the user’s complete information is returned as an instance of the User struct.
By categorizing code based on functionality as described above – separating data abstractions from operations – you can achieve a relatively simple and clear database management abstraction based on database/sql.
Implementing Database Migrations
Since no ORM is used, Miniflux implements its own database migration system. The general approach is:
All migration-related database changes are encapsulated as individual function values of type func(tx *sql.Tx) error:
var migrations = []func(tx *sql.Tx) error{
    func(tx *sql.Tx) (err error) {
        sql := `
            CREATE TABLE schema_version (
                version text not null
            );

            CREATE TABLE users (
                id serial not null,
                username text not null unique,
                password text,
                is_admin bool default 'f',
                language text default 'en_US',
                timezone text default 'UTC',
                theme text default 'default',
                last_login_at timestamp with time zone,
                primary key (id)
            );
            # Part of the code has been omitted...
        `
        _, err = tx.Exec(sql)
        return err
    },
    // Part of the code has been omitted...
}
The length of the []func(tx *sql.Tx) error slice serves as the migration version number. The database stores the version number of the last executed migration. At startup, if the version number in the database matches the slice length, no migration is needed. If the database version is less than the slice length, execution starts from the slice member at index version - 1 and proceeds to the end of the slice, after which the version number in the database is updated to the current slice length.
// Migrate executes database migrations.
func Migrate(db *sql.DB) error {
var currentVersion int
db.QueryRow(`SELECT version FROM schema_version`).Scan(¤tVersion)
// Part of the code has been omitted...
for version := currentVersion; version < schemaVersion; version++ {
newVersion := version + 1
tx, err := db.Begin()
if err != nil {
return fmt.Errorf("[Migration v%d] %v", newVersion, err)
}
if err := migrations[version](tx); err != nil {
tx.Rollback()
return fmt.Errorf("[Migration v%d] %v", newVersion, err)
}
if _, err := tx.Exec(`DELETE FROM schema_version`); err != nil {
tx.Rollback()
return fmt.Errorf("[Migration v%d] %v", newVersion, err)
}
if _, err := tx.Exec(`INSERT INTO schema_version (version) VALUES ($1)`, newVersion); err != nil {
tx.Rollback()
return fmt.Errorf("[Migration v%d] %v", newVersion, err)
}
if err := tx.Commit(); err != nil {
return fmt.Errorf("[Migration v%d] %v", newVersion, err)
}
}
return nil
}
Implementing Keyboard Shortcuts with Vanilla JavaScript
Similar to the keyboard shortcuts recently added to ChatGPT. On the ChatGPT web page, you can view all shortcuts with Ctrl+/ (GitHub/Jira use ? to display all shortcuts). Many SaaS apps support keyboard shortcuts – feel free to explore them.
The Miniflux project implements these keyboard shortcuts, and unlike the Ctrl+Key format used by many SaaS apps, Miniflux supports letter combinations, such as g u (press g then u). This approach largely avoids conflicts with system-wide shortcuts and is a relatively good shortcut implementation strategy.
Here’s a brief overview of how combination shortcuts are implemented:
A queue and a trigger array (containing all first letters of combination shortcuts) are created on the global object. The queue tracks inputs across multiple events. If the current event’s key is in the trigger array and the queue is empty, then the key is the first letter of a combination shortcut – the shortcut is not triggered, and the key is pushed to the queue, awaiting the next event.
In the subsequent event, the key is checked again against the trigger array. The same logic applies: if the key is not in the trigger array and the queue already has one member, it forms a complete combination shortcut, and the corresponding action is triggered.
Additionally, when designing the shortcut system, the event object’s target.tagName property is used to check whether the current event is associated with an input element. If so, shortcuts are not triggered – this design consideration is also worth referencing.
Implementing Touch Device Shortcuts with Vanilla JavaScript (Swipe-to-Delete / Double-Tap Navigation)
This effect is similar to the iPhone Mail app, where swiping left on a new email marks it as read and swiping right archives it. The Miniflux project implements these touch shortcuts.
The implementation approach for swipe animations:
A global instance is created via JavaScript that tracks the latest touch coordinates (finger position on the screen) across multiple touch events. The touchstart, touchmove, and touchend events are monitored: touchstart corresponds to the beginning of a touch, touchmove corresponds to moving the finger without releasing (think of it as a collection of many touch events, similar to frames in a video), and touchend corresponds to releasing the finger.
When these events fire, each event object contains the coordinates at the point of contact. The coordinates at touchstart are stored as the initial position on the global instance. In any subsequent touchmove event, the distance relative to the initial coordinates along the X-axis is calculated to obtain the real-time relative distance. With this distance, JavaScript updates the target element’s CSS translateX property in real time, creating the press-and-slide animation effect.
The double-tap page navigation approach:
The first tap’s timestamp is recorded via touchend. On the next touchend event, if the difference between the current timestamp and the previous one is less than 200ms, it’s recognized as a double-tap.
Integrating Prometheus
How to implement a /metrics API using client_golang to integrate the project with Prometheus.
The Miniflux project has full Prometheus integration and provides a corresponding Grafana visualization JSON file in the repository. If you’d like to integrate Prometheus into your own project, this is a good reference.
Miniflux primarily uses two metric types: Gauge and Histogram. The former is suitable for real-time state data (CPU utilization, load, memory usage, temperature, humidity – data without a clear start and end), while the latter is suitable for data with specific time distributions (with clear start and end points, such as request duration, database query time, file I/O duration, queue wait time, inter-service call time, garbage collection duration, user session duration).
Offline Interaction via Service Worker with Vanilla JavaScript
When the client device goes offline, JavaScript and local caching are used to inform the user about the network failure reason and recommended actions. This implementation makes users feel like they’re using an app rather than a website.
Building a High-Quality SaaS Application
The founder of Heroku summarized some principles in this area: The Twelve-Factor App.
The Miniflux project follows this methodology.
Configuration Management via Environment Variables and Config Files
If you’ve deployed projects on platforms like Heroku, this should be familiar. These platforms require users to provide environment variables and values for customizing the project, so this is a commonly used skill.
The configuration file itself is in KEY=Value format, where KEY is the environment variable and Value is the value, one per line.
The iteration approach uses os.Environ() to get all runtime environment variables. Assuming the return value is:
[]string{"LOG_FILE=./stdout.log", "PROXY_PRIVATE_KEY=RSA...XXX" }
Iterate over the return value, using strings.SplitN in each iteration to extract the key and corresponding value, then map them to logic:
for _, line := range lines {
    fields := strings.SplitN(line, "=", 2)
    key := strings.TrimSpace(fields[0])
    value := strings.TrimSpace(fields[1])
    switch key {
    case "LOG_FILE":
        p.opts.logFile = parseString(value, defaultLogFile)
    // Part of the code has been omitted...
    }
}
This links configuration items to their corresponding code logic.
Since the config file is simply a line-by-line storage of environment variable key-value pairs, you only need to scan the file line by line with a Scanner, then process each line using the logic above.
Generic Slice Deduplication Function in Go
As follows:
// removeDuplicate removes duplicate entries from a slice
func removeDuplicates[T string | int](sliceList []T) []T {
    allKeys := make(map[T]bool)
    list := []T{}
    for _, item := range sliceList {
        if _, value := allKeys[item]; !value {
            allKeys[item] = true
            list = append(list, item)
        }
    }
    return list
}
Implementing Interactive Command-Line Interfaces in Go
For example, reading a username and password in an interactive CLI, with the password input hidden (similar to entering a user password in a Linux environment).
This can be done using golang.org/x/term:
func askCredentials() (string, string) {
	fd := int(os.Stdin.Fd())

	if !term.IsTerminal(fd) {
		printErrorAndExit(fmt.Errorf("this is not a terminal, exiting"))
	}

	fmt.Print("Enter Username: ")

	reader := bufio.NewReader(os.Stdin)
	username, _ := reader.ReadString('\n')

	fmt.Print("Enter Password: ")

	state, _ := term.GetState(fd)
	defer term.Restore(fd, state)
	bytePassword, _ := term.ReadPassword(fd)

	fmt.Printf("\n")
	return strings.TrimSpace(username), strings.TrimSpace(string(bytePassword))
}
Integrating systemd Watchdog and Notify Socket
This functionality is similar to Kubernetes’ Readiness Probe and Liveness Probe – checking whether the application is ready at startup, and periodically performing health checks during runtime to ensure continued reliable operation.
I’ve written a detailed explanation in my tweet.
Compile-Time Interface Compliance in Go
Force a type to implement a specific interface, otherwise compilation fails:
// Making sure that we're adhering to the autocert.Cache interface.
var _ autocert.Cache = (*CertificateCache)(nil)
autocert.Cache is an interface type:
// Cache is used by Manager to store and retrieve previously obtained certificates
// and other account data as opaque blobs.
//
// Cache implementations should not rely on the key naming pattern. Keys can
// include any printable ASCII characters, except the following: \/:*?"<>|
type Cache interface {
	// Get returns a certificate data for the specified key.
	// If there's no such key, Get returns ErrCacheMiss.
	Get(ctx context.Context, key string) ([]byte, error)

	// Put stores the data in the cache under the specified key.
	// Underlying implementations may use any data storage format,
	// as long as the reverse operation, Get, results in the original data.
	Put(ctx context.Context, key string, data []byte) error

	// Delete removes a certificate data from the cache under the specified key.
	// If there's no such key in the cache, Delete returns nil.
	Delete(ctx context.Context, key string) error
}
The Miniflux project enforces that the CertificateCache struct implements this interface, ensuring proper centralized certificate storage.
Implementing UPSERT Operations with Raw SQL
In Miniflux, when an RSS feed entry contains enclosures (audio/image URLs, etc.), the enclosures are stored using SQL UPSERT operations. An UPSERT operation means: for a specific resource, if a record with the corresponding ID exists, update it; otherwise, create a new one.
The code:
func (s *Storage) createEnclosure(tx *sql.Tx, enclosure *model.Enclosure) error {
	enclosureURL := strings.TrimSpace(enclosure.URL)
	if enclosureURL == "" {
		return nil
	}

	query := `
		INSERT INTO enclosures
			(url, size, mime_type, entry_id, user_id, media_progression)
		VALUES
			($1, $2, $3, $4, $5, $6)
		ON CONFLICT (user_id, entry_id, md5(url)) DO NOTHING
		RETURNING
			id
	`
	if err := tx.QueryRow(
		query,
		enclosureURL,
		enclosure.Size,
		enclosure.MimeType,
		enclosure.EntryID,
		enclosure.UserID,
		enclosure.MediaProgression,
	).Scan(&enclosure.ID); err != nil && err != sql.ErrNoRows {
		return fmt.Errorf(`store: unable to create enclosure: %w`, err)
	}

	return nil
}
In the code above, if a specific user’s feed entry contains an enclosure, the URL is used for deduplication – if a record already exists for that enclosure, it’s skipped; otherwise, a new record is created.
Obtaining Client IP Addresses in Go
A commonly used skill. The approach is to first check specific request headers that may contain the real source IP. These headers are strings like 1.1.1.1,2.2.2.2, representing the client IP and proxy server IPs. If these header values are non-empty, the string is split by , and the first element of the resulting array is taken.
// FindClientIP returns the client real IP address based on trusted Reverse-Proxy HTTP headers.
func FindClientIP(r *http.Request) string {
	headers := []string{"X-Forwarded-For", "X-Real-Ip"}
	for _, header := range headers {
		value := r.Header.Get(header)

		if value != "" {
			addresses := strings.Split(value, ",")
			address := strings.TrimSpace(addresses[0])
			address = dropIPv6zone(address)

			if net.ParseIP(address) != nil {
				return address
			}
		}
	}

	// Fallback to TCP/IP source IP address.
	return FindRemoteIP(r)
}
If these header values are empty, the network-layer source IP is used as the real IP. If that also fails, 127.0.0.1 is used as the fallback:
// FindRemoteIP returns remote client IP address.
func FindRemoteIP(r *http.Request) string {
	remoteIP, _, err := net.SplitHostPort(r.RemoteAddr)
	if err != nil {
		remoteIP = r.RemoteAddr
	}
	remoteIP = dropIPv6zone(remoteIP)

	// When listening on a Unix socket, RemoteAddr is empty.
	if remoteIP == "" {
		remoteIP = "127.0.0.1"
	}

	return remoteIP
}
Distinguishing Single and Double Clicks with Vanilla JavaScript
This is implemented by capturing touchend events. A global object stores the timestamp of each touchend event. By comparing the current event’s timestamp with the previous one, if the interval is less than 200ms, it’s a double-click; otherwise, it’s a single click.
Implementing Web Pagination
An extremely common skill. It’s essentially implemented through SQL queries with specific OFFSET and LIMIT values, and this project is no exception.
Performance Tracking via Server-Timing
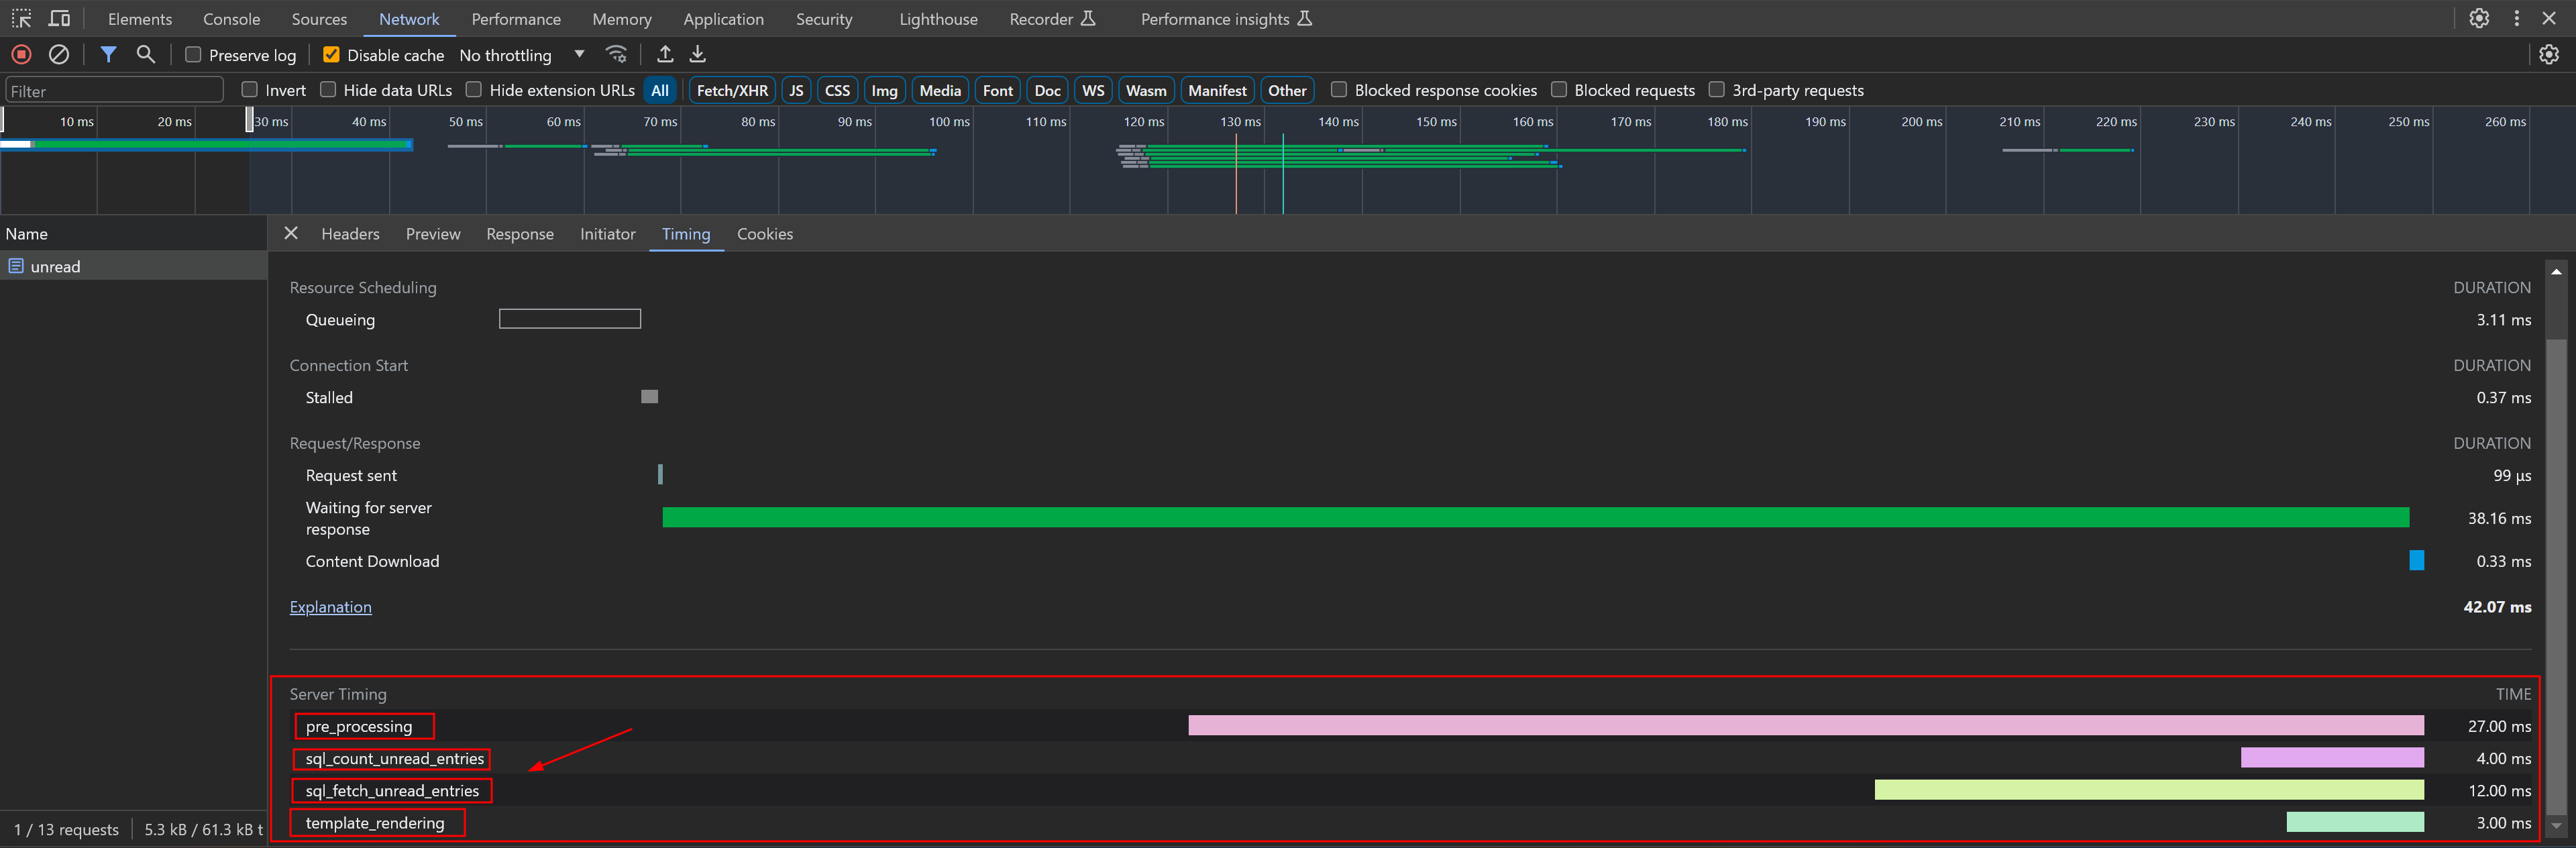

Server-Timing is an HTTP response header. Through Server-Timing, we can see in Chrome DevTools how long a specific API took to execute on the server side. For example, in the screenshots above for the /unread API:
- The server took 4ms to count all unread articles via SQL
- The server took 12ms to fetch the latest 20 articles via SQL
- The server took 3ms to render the template
Implementing Modals Without a Framework
A common skill. Here’s an example using the ? shortcut modal – when you press ?, a detailed shortcut reference page appears.
The approach is to manipulate the DOM tree via JavaScript. When the modal appears, the content from a hidden <template>...</template> element is used as the content of a newly created <div></div>, which is then appended to the end of the body.
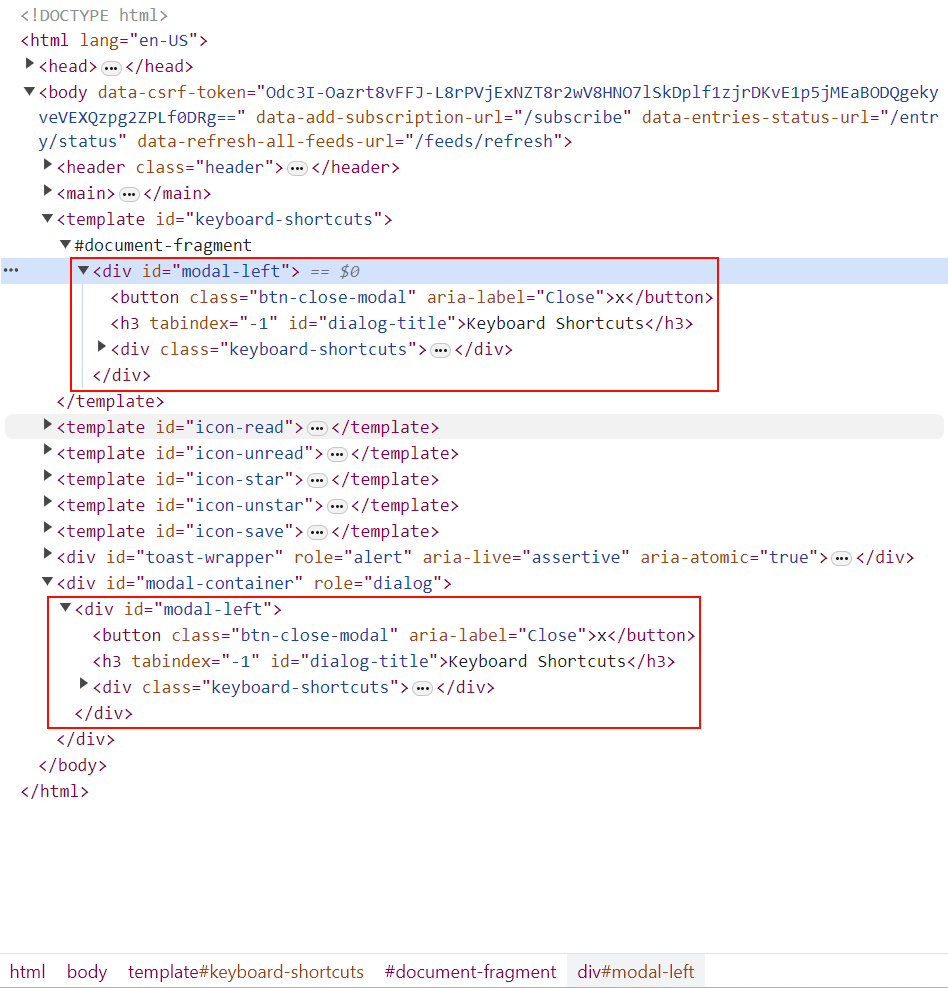
Since the <div></div> content includes default CSS class names, the corresponding side panel appears as soon as the related DOM is created.
static open(fragment, initialFocusElementId) {

	// Part of the code has been omitted...

	let container = document.createElement("div");
	container.id = "modal-container";
	container.setAttribute("role", "dialog");

	// The fragment corresponds to the template content, cloned via importNode with the second parameter set to true (recursive copy)
	container.appendChild(document.importNode(fragment, true));
	document.body.appendChild(container);

	// Part of the code has been omitted...

}
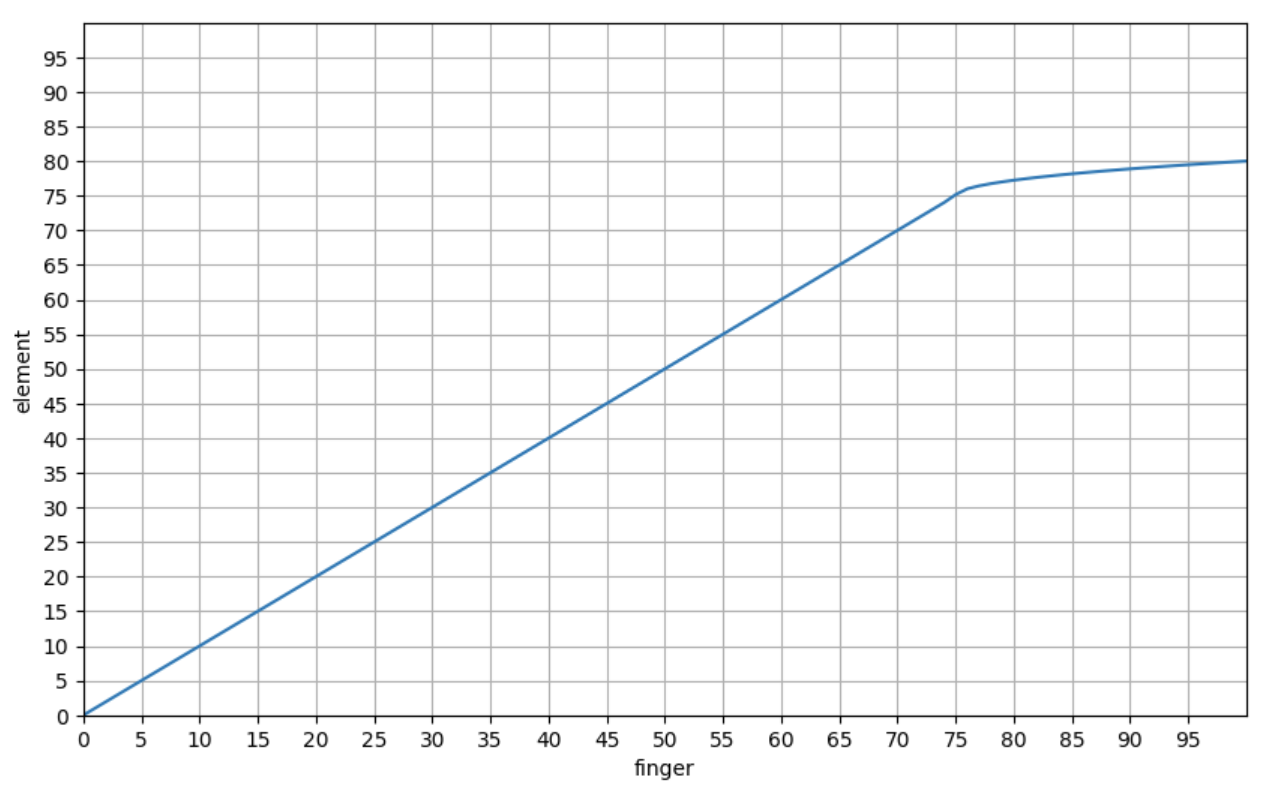
Adding Non-Linear Animation Effects to Swipe Gestures with Vanilla JavaScript
When swiping left/right on an RSS item, once the swipe distance exceeds 75 pixels, there’s a resistance feedback – this is the application of non-linear animation.
The general principle:
A threshold is applied to the real-time relative distance. When it exceeds this threshold, the relationship between finger movement distance and element movement speed changes from linear to a square root relationship.
The chart below shows the relationship between finger movement distance and element movement distance:
Using Go’s Template System
This corresponds to the template systems of many web frameworks, such as Django/Rails. If your project uses Go Templates, it’s worth a look.
Adding Ansible Filters-Like Functions to Go Templates (e.g., dict2items)
The project implements many similar functions. If your project needs to implement filters-like functions, this is a good reference.
Using the Builder Pattern
In the Miniflux project, the builder pattern is used when constructing complex requests and SQL queries. This includes both Go and Vanilla JavaScript implementations.
Here’s an example analysis of the builder pattern applied to SQL queries.
Miniflux polls subscribed sites, fetches articles, and stores them in the database. Below is the database operation logic for querying fetched articles.
Since article management involves different users, categories, article states, and other conditions, the complexity warrants a builder.
The SQL statement is abstracted through a struct:
// EntryQueryBuilder builds a SQL query to fetch entries.
type EntryQueryBuilder struct {
	store           *Storage
	args            []interface{}
	conditions      []string
	sortExpressions []string
	limit           int
	offset          int
	fetchEnclosures bool
}

// NewEntryQueryBuilder returns a new EntryQueryBuilder.
func NewEntryQueryBuilder(store *Storage, userID int64) *EntryQueryBuilder {
	return &EntryQueryBuilder{
		store:      store,
		args:       []interface{}{userID},
		conditions: []string{"e.user_id = $1"},
	}
}
Different concrete builders encapsulate individual SQL statement logic:
// WithFeedID filter by feed ID.
func (e *EntryQueryBuilder) WithFeedID(feedID int64) *EntryQueryBuilder {
	if feedID > 0 {
		e.conditions = append(e.conditions, fmt.Sprintf("e.feed_id = $%d", len(e.args)+1))
		e.args = append(e.args, feedID)
	}
	return e
}

// WithCategoryID filter by category ID.
func (e *EntryQueryBuilder) WithCategoryID(categoryID int64) *EntryQueryBuilder {
	if categoryID > 0 {
		e.conditions = append(e.conditions, fmt.Sprintf("f.category_id = $%d", len(e.args)+1))
		e.args = append(e.args, categoryID)
	}
	return e
}

// Part of the code has been omitted...
Regarding the concrete builder implementation, since Go supports pointer receiver methods, the project doesn’t use fluent calling syntax for the builder pattern:
builder := h.store.NewEntryQueryBuilder(userID)
builder.WithFeedID(feedID)
builder.WithCategoryID(categoryID)
builder.WithStatuses(statuses)

// Part of the code has been omitted...

entries, err := builder.GetEntries()
With fluent calling syntax, it could also be written as:
builder := h.store.NewEntryQueryBuilder(userID)
builder.WithFeedID(feedID).WithCategoryID(categoryID).WithStatuses(statuses).GetEntries()
Finally, the GetEntries method is the execution logic that converts the struct into a concrete statement and executes the query:
// GetEntry returns a single entry that match the condition.
func (e *EntryQueryBuilder) GetEntry() (*model.Entry, error) {
	e.limit = 1
	entries, err := e.GetEntries()

    // Part of the code has been omitted...

	return entries[0], nil
}

// GetEntries returns a list of entries that match the condition.
func (e *EntryQueryBuilder) GetEntries() (model.Entries, error) {
	query := `
		SELECT
			e.id,
			e.user_id,
			e.feed_id,
            # Part of the code has been omitted...
			f.title as feed_title,
			f.feed_url,
			f.site_url,
            # Part of the code has been omitted...
		FROM
			entries e
		LEFT JOIN
			feeds f ON f.id=e.feed_id
		LEFT JOIN
			categories c ON c.id=f.category_id
		LEFT JOIN
			feed_icons fi ON fi.feed_id=f.id
		LEFT JOIN
			users u ON u.id=e.user_id
		WHERE %s %s
	`

	condition := e.buildCondition()
	sorting := e.buildSorting()
	query = fmt.Sprintf(query, condition, sorting)

	rows, err := e.store.db.Query(query, e.args...)

    // Part of the code has been omitted...

	entries := make(model.Entries, 0)
	for rows.Next() {
		var iconID sql.NullInt64
		var tz string
		var hasEnclosure sql.NullBool

		entry := model.NewEntry()

		err := rows.Scan(
			&entry.ID,
			&entry.UserID,
			&entry.FeedID,
            // Part of the code has been omitted...
			&entry.Feed.Title,
			&entry.Feed.FeedURL,
			&entry.Feed.SiteURL,
            // Part of the code has been omitted...
		)

        // Part of the code has been omitted...
	}
	return entries, nil
}
The builder pattern abstracts different SQL clauses (WHERE/ORDER BY/LIMIT) into different concrete builders (the WithXXX methods above). By composing different concrete builders, fine-grained and flexible control is achieved.
Implementing Estimated Reading Time
The general approach:
Each user is assigned a default reading speed, e.g., 200 runes per minute. The calculation is:
total article length / reading speed
This gives the approximate reading time (the article length is measured in Runes rather than bytes, reflecting multilingual friendliness).
XML Data Binding – Serialization and Deserialization to Go Structs
A common skill, similar to JSON serialization and deserialization.
Implementing i18n
A common skill – multilingual support is essentially a standard feature.
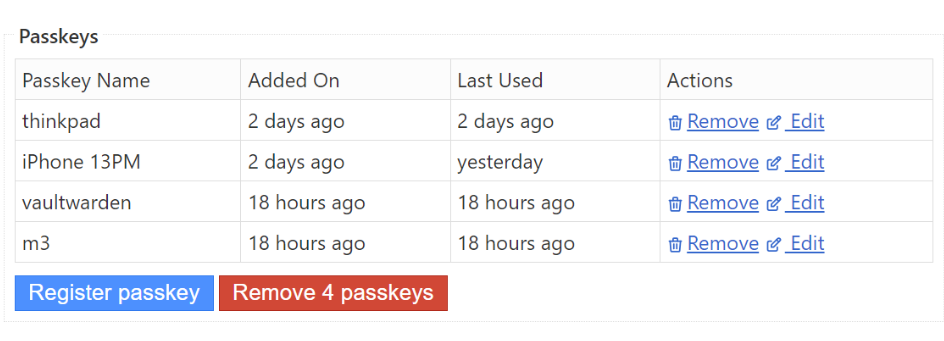
An interesting point here is how to implement singular and plural forms for metrics. For example:

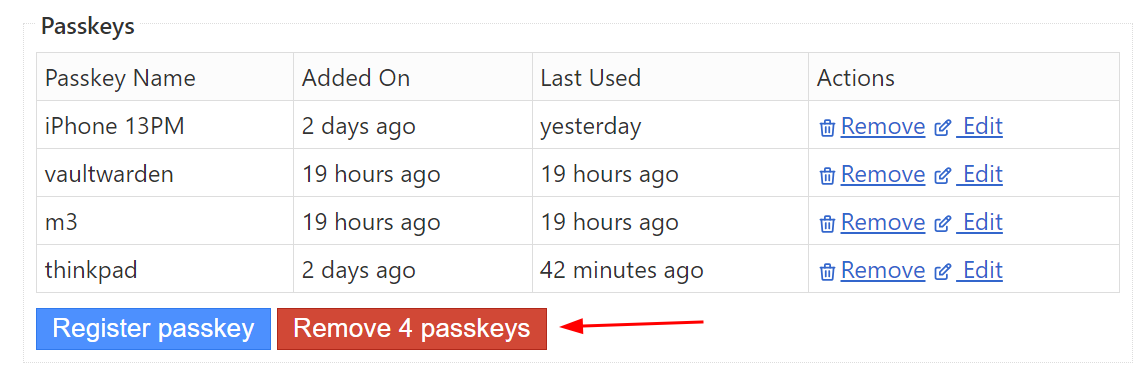
In the screenshots above, when there’s only 1 bound Passkey, Remove 1 Passkey uses the singular form. In the second screenshot, it uses the plural form.
The general approach: implement a template filter that determines the appropriate pluralization function based on the user’s locale (different languages have different rules for singular/plural forms). The pluralization function does one thing: return an index. For English, a word has only 2 forms (singular/plural). So in the English i18n file, the button text has two variants:
{
	// Part of the code has been omitted...
	"page.settings.webauthn.delete": [
		"Remove %d passkey",
		"Remove %d passkeys"
	]
}
The pluralization function takes the count as a parameter. If the count is greater than 1, it returns the index for the plural form expression in the English i18n file – index 1 for the page.settings.webauthn.delete array (0-indexed). Otherwise, it returns index 0.
With the index, fmt.Sprintf() is used to get the expression at that index and render the count within it, producing the final string.
Raw SQL Practices
Since the project doesn’t use an ORM, there are many SQL examples to reference, such as creating indexes, join queries, full-text search, etc.
Regarding SERIAL and BIGSERIAL:
Many tables in Miniflux use SERIAL as the primary key type. When PostgreSQL encounters this type, it automatically creates a corresponding sequence (auto-incrementing integers starting from 1). SERIAL is a 32-bit integer (4 bytes), while BIGSERIAL is a 64-bit integer (8 bytes). In most cases, if you’re unsure whether you’ll exceed SERIAL’s limits, using BIGSERIAL from the start is a simple forward-looking practice.

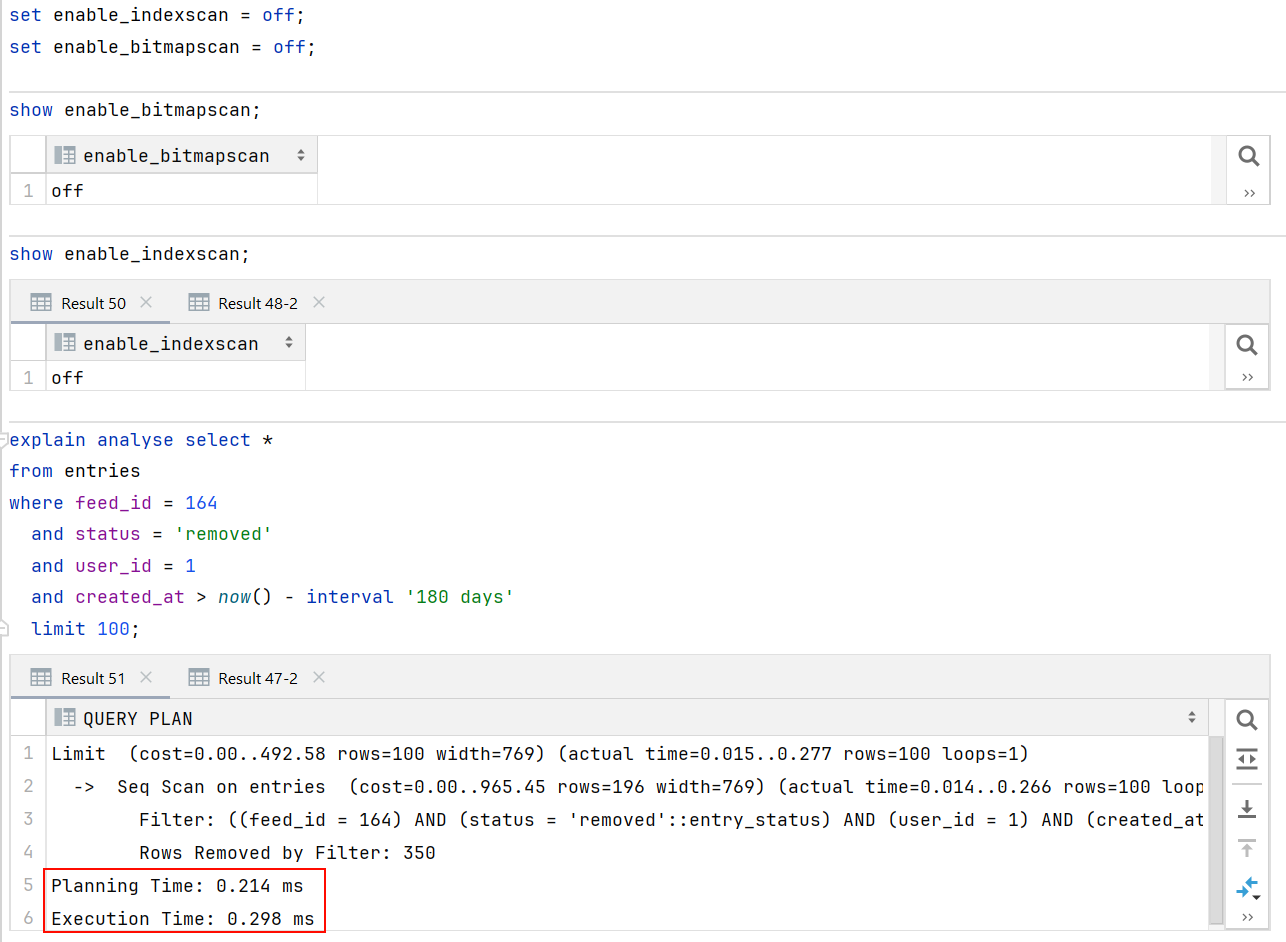
Regarding index performance evaluation:
Index performance can be verified using EXPLAIN and EXPLAIN ANALYSE. The former shows the planned operations (whether a sequential scan occurs, how indexes are used, estimated row counts – these are planned operations, not actual execution), while the latter shows resource usage through actual execution (including execution time and actual database query operations).
You can disable indexing in a database session to verify the performance improvement indexes provide:
set enable_indexscan = off;
set enable_bitmapscan = off;
Here’s an example without indexes:
Compared with indexes:
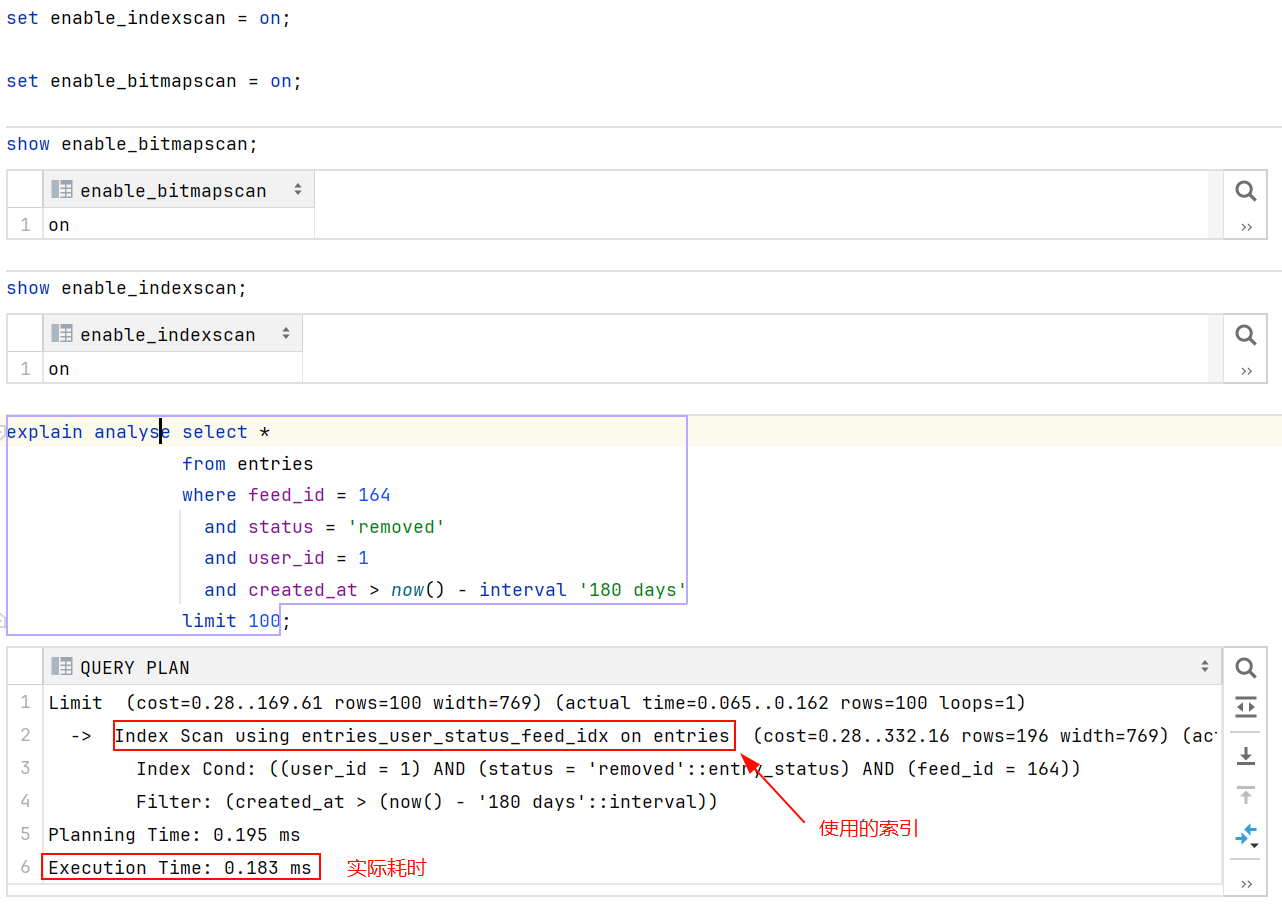
Indexes exist to avoid full table scans and are suitable for fields appearing in WHERE/ORDER BY/GROUP BY clauses or fields selected in joins. Unique indexes also enforce uniqueness of inserted records.
Static Asset Caching Strategy
This mainly covers the HTTP request headers If-None-Match and If-Modified-Since, and the HTTP response headers ETag, Last-Modified, and Expires – all related to client-side resource caching strategies. I’ve written a detailed explanation in my tweet – check it out if you’re interested.
Automatic Theme Switching (Light/Dark)
This consists of two parts.
Part 1:
<meta name="theme-color" content="{{ theme_color .theme "light" }}" media="(prefers-color-scheme: light)">
<meta name="theme-color" content="{{ theme_color .theme "dark" }}" media="(prefers-color-scheme: dark)">
The above is the unrendered template content. After rendering, it looks something like:
<meta name="theme-color" content="#fff" media="(prefers-color-scheme: light)">
<meta name="theme-color" content="#222" media="(prefers-color-scheme: dark)">
This configures the address bar color on mobile devices.
Part 2 uses the :root pseudo-class selector and media queries – the principle is CSS variable overriding for color-related properties.
By default, color-related CSS properties reference variables, with default values set to the light theme:
body {
    font-family: var(--font-family);
    text-rendering: optimizeLegibility;
    color: var(--body-color);
    background: var(--body-background);
}

:root {
    --font-family: system-ui, -apple-system, "Segoe UI", Roboto, "Helvetica Neue", Arial, "Noto Sans", sans-serif, "Apple Color Emoji", "Segoe UI Emoji", "Segoe UI Symbol", "Noto Color Emoji";
    --body-color: #333;
    --body-background: #fff;
    --hr-border-color: #ccc;
    --title-color: #333;
    --link-color: #3366CC;
    --link-focus-color: red;
    --link-hover-color: #333;
    --link-visited-color: purple;

	/* Part of the code has been omitted... */

}
When the system color scheme changes, the media query causes dark theme variable values to override the defaults, switching the site from light to dark:
@media (prefers-color-scheme: dark) {
	:root {
        --body-color: #efefef;
        --body-background: #222;
        --hr-border-color: #555;
        --title-color: #aaa;
        --link-color: #aaa;
        --link-focus-color: #ddd;
        --link-hover-color: #ddd;
        --link-visited-color: #f083e4;

		/* Part of the code has been omitted... */

	}
}
Demo:
Cookie-Based Session Management
This covers how to create/restore sessions based on cookies to manage user login state and client-side personalization settings (such as font/theme).
Here’s how session management works in the Miniflux project:
Miniflux stores sessions directly in the database, managed through two tables: AppSession and UserSession.
AppSession handles user-independent public settings like CSRF, Language, Theme, etc. – settings that can be modified without logging in.
UserSession primarily stores user tokens. A token is a random string generated by the server after a successful login (a temporary password valid for 30 days). After each successful login, the server sends the token as a cookie to the client (e.g., the user’s browser) and records the relationship between the token and user ID in the UserSession table. The client (browser) includes this cookie in every subsequent request. Upon receiving each new request, the server reads the token from the cookie and queries the UserSession table. If a record exists, the user is authenticated – the authentication key in the request context is set to true, and user information is restored based on the user ID from the record. Subsequent operations can then proceed under that user’s identity, and checking whether the request is authorized only requires verifying the authentication key in the context.
The Miniflux project implements a worker using Channels and Goroutines for scheduled tasks. The worker runs every 24 hours and includes cleanup operations for expired sessions in both the UserSession and AppSession tables. It essentially compares the created_at field and deletes records where the duration exceeds the configured time (e.g., 30 days):
DELETE FROM
    user_sessions
WHERE
    id IN (SELECT id FROM user_sessions WHERE created_at < now() - interval '%d days')
Using Go’s Valuer and Scanner Interfaces
The project’s model.Session struct corresponds to the sessions database table. The struct’s data member is of type SessionData, which is serialized as jsonb when stored in the database. By implementing the Valuer and Scanner interfaces for SessionData, automatic serialization and deserialization of this embedded struct occurs when db.Exec or db.Scan is called on model.Session.
Cryptography
A common skill. Beyond generating random passwords, this includes encrypting plaintext passwords and computing hashes. These implementations are in the crypto package.
Database Health Checks
A common skill. The standard library provides APIs you can use directly. Database health check logic is used in many scenarios: at startup, as a command-line operation, and as an API endpoint (/healthcheck).
The following Ansible task shows the health check implementation when deploying Miniflux with Docker:
- name: "Start docker miniflux image"
  docker_container:
    name: "miniflux"
    image: "miniflux/miniflux:latest"
    domainname: "miniflux"
    hostname: "miniflux"
    # Part of the code has been omitted...
    env:
      NODE_ENV: production
      RUN_MIGRATIONS: "1"
      # Part of the code has been omitted...
    healthcheck:
      test: ["CMD", "/usr/bin/miniflux", "-healthcheck", "auto"]
      interval: 10s
      timeout: 10s
      retries: 3
      start_period: 30s
The health check command includes database connectivity and operability checks. Go’s standard library already has mature APIs for this – you just need to integrate them into your command-line options.
Implementing BasicAuth Authentication
This covers two parts: basic authentication for Prometheus Metrics, and basic authentication for user login, including how to encrypt and verify plaintext passwords using bcrypt.
Implementing User API Key Authentication
If you’re implementing a user API key system, this is a good reference.
Miniflux’s implementation creates an API key table that records user IDs and their corresponding keys. During authentication, the User table is LEFT JOINed with the API key table, using the token column as a filter condition. If a specific key (token column value) matches a record in the joined table and a user can be recovered, authentication succeeds.
The Adapter Pattern in Go’s Standard Library
In the standard library, the http.Handler interface is a classic application of the adapter pattern.
Integrating Let’s Encrypt for Self-Hosted HTTPS
This implements a maintenance-free HTTPS server that automatically requests certificates from Let’s Encrypt via HTTP-01/TLS-ALPN-01 at startup, and automatically renews and reloads certificates before they expire.
The Miniflux project has a complete implementation of this.
Static Asset Bundling in Go
Since Miniflux advocates for simple delivery, the entire project is bundled into a single binary (CSS files, HTML files, JS files, images) – only one binary file is delivered.
If you’re interested in the following topics, check out the code:
- How to embed static files into the production binary using Go Embed?
- How to load these assets into memory at runtime?
- How to compress these resources during bundling?
- How does the template system organize HTML file reuse? For example, how does layout.html work?
- How are JavaScript files loaded?
Preventing CSRF with CSRF Tokens
A CSRF token is a randomly generated string. In the Miniflux project, the CSRF token is stored in the database as part of the user-independent session. When the client sends a POST request, the HTML form previously obtained via GET contains a hidden input tag, for example:
<form action="/login" method="post">
    <input type="hidden" name="csrf" value="{{ .csrf }}">

    <label for="form-username">username:</label>
    <input type="text" name="username" id="form-username" value="default value" autocomplete="username" required autofocus>

    <label for="form-password">password:</label>
    <input type="password" name="password" id="form-password" value="default value" autocomplete="current-password" required>

    <div class="buttons">
        <button type="submit" class="button button-primary">submit</button>
    </div>
</form>
In the example above, the CSRF input’s value is a placeholder, meaning the actual value is dynamically generated when the server responds to the GET request. The user enters their credentials in the form containing the CSRF token and clicks submit, including the CSRF token in the form submission.
An attacker would try to forge a POST request, such as a password change request, and deliver this forged request to the victim via promotional offers or data breach notifications (containing links in SMS). If the victim previously logged into the website, the browser has cookies maintaining the login state. Without a CSRF policy, when the victim clicks the link, the forged request would be sent to the server as a legitimate request, and the password would be stolen.
How a website with CSRF tokens defends against this:
Before processing any POST request, the CSRF token validation logic runs. Since this token is dynamically generated server-side as part of the HTML each time a user makes a GET request before a POST request, when an attacker forges a request, the same-origin policy (the browser prevents site A’s JavaScript from fetching site B’s CSRF token via fetch, and prevents site A from accessing site B’s local cache containing the CSRF token) means the forged request cannot obtain a valid CSRF token, and the server can identify it.
On the server, the middleware that validates requests contains the following logic:
if r.Method == http.MethodPost {
    formValue := r.FormValue("csrf")
    headerValue := r.Header.Get("X-Csrf-Token")

    if session.Data.CSRF != formValue && session.Data.CSRF != headerValue {
        slog.Warn("Invalid or missing CSRF token",
            slog.Any("url", r.RequestURI),
            slog.String("form_csrf", formValue),
            slog.String("header_csrf", headerValue),
        )

        if mux.CurrentRoute(r).GetName() == "checkLogin" {
            html.Redirect(w, r, route.Path(m.router, "login"))
            return
        }

        html.BadRequest(w, r, errors.New("invalid or missing CSRF"))
        return
    }
}
If the user initiates a POST request from the login page and the CSRF token is invalid, the user is redirected to re-obtain the login page (the server will dynamically render a new CSRF token). Otherwise, the request is rejected outright (HTTP Status Code: 400).
Many modern frontend requests use AJAX or the Fetch API rather than form submissions. For such requests, the X-Csrf-Token request header is used to identify cross-site request forgery.
The X-Csrf-Token value is set using the builder pattern to construct AJAX requests:
class RequestBuilder {
    constructor(url) {
        this.callback = null;
        this.url = url;
        this.options = {
            method: "POST",
            cache: "no-cache",
            credentials: "include",
            body: null,
            headers: new Headers({
                "Content-Type": "application/json",
                "X-Csrf-Token": this.getCsrfToken()
            })
        };
    }

// Part of the code has been omitted...

    getCsrfToken() {
        let element = document.querySelector("body[data-csrf-token]");
        if (element !== null) {
            return element.dataset.csrfToken;
        }

        return "";
    }
}
In the JavaScript code above, document.querySelector searches the current page to get the CSRF token value from the body’s custom data attribute (this value is the same as the CSRF token in the form), and includes it as an AJAX request header sent to the server.
Integrating OIDC Authentication
This covers the details of the authorization code flow, how to map existing users to OIDC information, and how to automatically create users based on OIDC information.
The authorization code flow:
On the login page, the user clicks the authorization login button to initiate an authorization code flow login request. The server receives the request and redirects the user to the authorization server.
The redirect request includes many parameters, for example (formatted for readability):
https://accounts.jinmiaoluo.com/realms/jinmiaoluo/protocol/openid-connect/auth?
&client_id=openid_miniflux
&code_challenge=igxNrRorNVbX0a31uiJw6z3ZWkDG9M0ujuGb58oWtys
&code_challenge_method=S256
&redirect_uri=https%3A%2F%2Fminiflux.jinmiaoluo.com%2Foauth2%2Foidc%2Fcallback
&response_type=code
&scope=openid+profile+email
&state=acc073d048014997ce8b58606f4e096b6b933e305ccf9b21
This includes a random string state and a SHA-256 hash (code_challenge) of another random string (codeVerifier). Both values are stored in the session table.
After the user successfully logs in on the authorization server’s login page, the authorization server redirects the user to the server’s callback URL (redirect_uri) and stores the code_challenge value for later use. The callback request includes parameters like:
https://miniflux.jinmiaoluo.com/oauth2/oidc/callback?
&state=acc073d048014997ce8b58606f4e096b6b933e305ccf9b21
&session_state=1d05b9ae-5446-4309-999c-471c8e8c6713
&code=5ea52ccf-6af7-4aec-a559-a62cdc9b366e.1d05b9ae-5446-4309-999c-471c8e8c6713.96cf1386-b0e1-4e3b-93c0-541fc18799d7
The server receives the request and uses the code along with the codeVerifier stored in the session table to request a token from the authorization server. The authorization server validates the code, computes a fresh code_challenge from the codeVerifier using the specified code_challenge_method, and if it matches the code_challenge submitted during login, grants the token.
After obtaining the token, the server uses the OIDC entrypoint to discover the userinfo query URL (no authorization needed), then accesses the userinfo API with the token (token authentication required) to retrieve the corresponding OIDC user information (including the OIDC user ID).
Miniflux records the mapping between the OIDC user ID (stored in the openid_connect_id database field) and the user table ID. If a record can be found via openid_connect_id, the corresponding user’s login succeeds – a UserSession token record is inserted and a login-state cookie is issued.
Explaining state:
In the authorization code flow, state prevents CSRF attacks targeting the server. Suppose the user has previously logged into the authorization server (having a cookie for the authorization server’s login page) and clicks a forged authorization request link (in an SMS or email). The attacker modifies the server callback URL in the authorization request to point to the attacker’s server. After obtaining the valid authorization code, the attacker sends it to the real server. However, since state is session-scoped, modern browsers’ same-origin policy prevents site A from accessing URL parameters (state) of site B. Therefore, the attacker cannot obtain the correct state value. When the attacker sends a request with a forged state value, the server detects that the state in the session table doesn’t match the attacker’s value, and the attack is identified.
Explaining codeVerifier and code_challenge:
This defense targets attacks directly against the authorization server. Suppose the authorization code is leaked through a man-in-the-middle attack. The attacker directly requests a token from the authorization server. Since the user’s login recorded the hash (code_challenge) of the codeVerifier on the authorization server, the attacker doesn’t have the correct codeVerifier. The hash computed from the attacker’s codeVerifier won’t match the stored code_challenge, and the attack is identified.
WebAuthn (Passkey) Integration
WebAuthn (Passkey) is a recently introduced standard that allows users to quickly and securely log into websites using their device’s face recognition or fingerprint – similar to unlocking a computer or phone.
This implementation consists of two parts.
First, device registration. Users first create and log into their account, then bind their device to the account on the profile settings page.
The binding process can be summarized as: the user triggers a device binding request; the server returns the information needed to create a key pair to the browser; the browser uses a JavaScript API to trigger the local device to create a key pair (this includes the authenticator verifying the user’s identity, then creating the key pair upon verification); after the key pair is created, the public key is returned to the browser while the private key and site information are saved locally; the browser sends the public key to the server, which saves it and creates a database record binding the public key to the corresponding user.
Second, user authentication. The user triggers login.
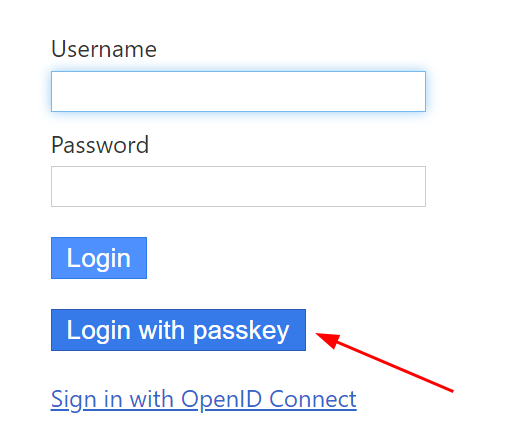
The server returns a challenge to the browser. The browser calls the authenticator via a JavaScript API. The authenticator uses the corresponding private key (matched by site information) to sign the challenge and returns the signature along with user information to the browser.
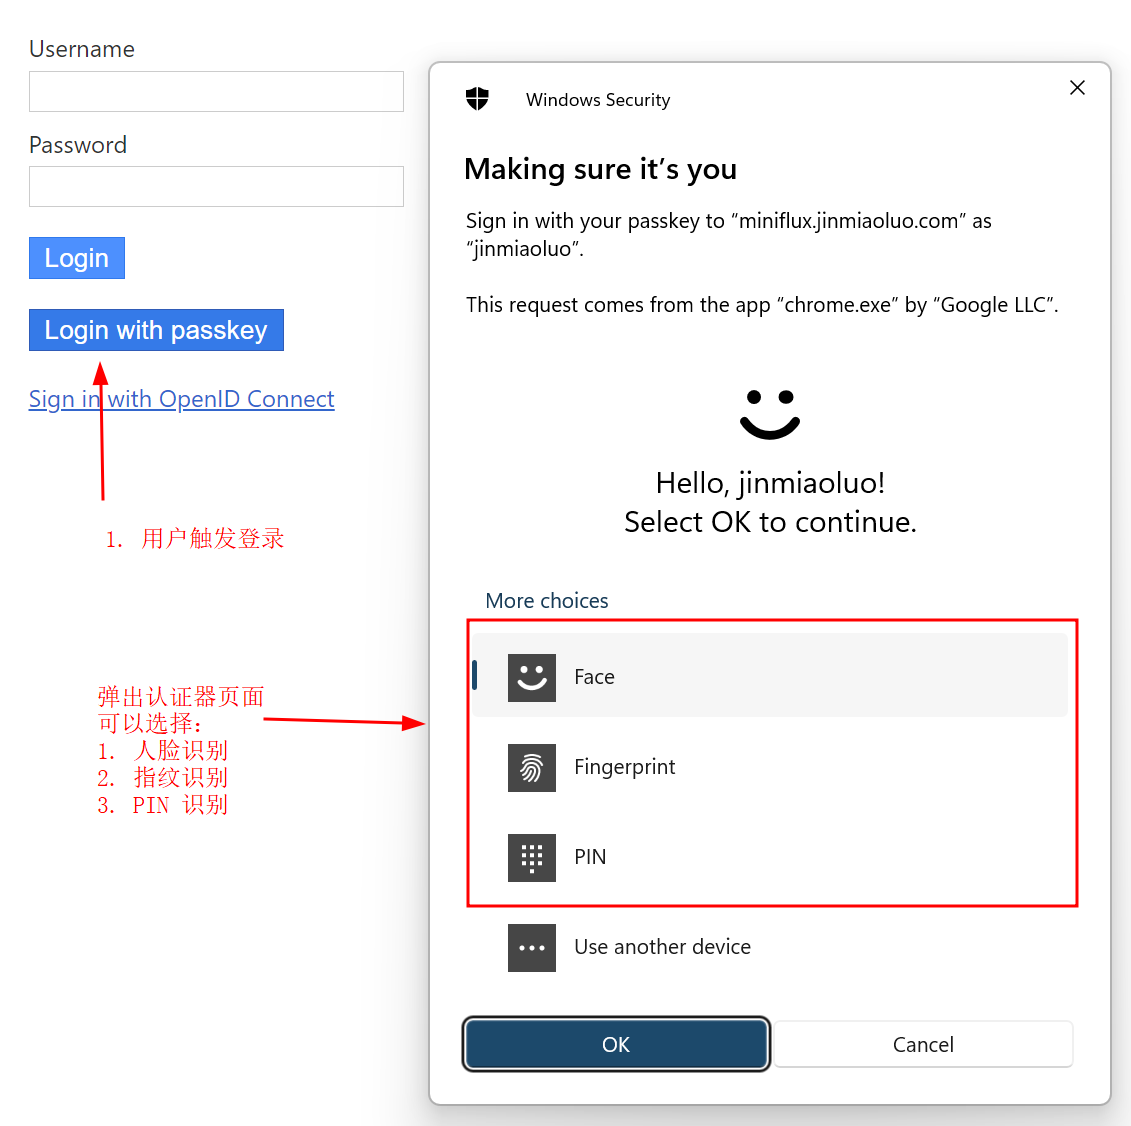
The browser forwards this information (Assertion) to the server. The server identifies the corresponding public key based on the user information in the Assertion, and uses the public key and challenge to verify the signature in the Assertion. If verification passes, login succeeds.
Closing
If you find any errors in this article, feel free to leave a comment below.